FDA Reg. 3039441248 · EU MDR · UK MHRA · ISO 13485
9:30–18:00 China time (UTC+8)
Case study
Dentures
Complete

Denture Repair Case: An Upper Denture Broken in Half, Joined and Relined in One Trip

This denture repair case is an upper complete denture that split straight down the middle. Another lab made it. The dentist sent us both halves, a reline impression taken inside them, and an Rx with two jobs: join the halves and reline the base, in one trip, without moving a single tooth.

Joining the halves alone would have been the quick job. But this denture had been loose for months before it broke. A repair without a reline would have put a loose denture back in the patient’s mouth, and the break would most likely come back along the same line.

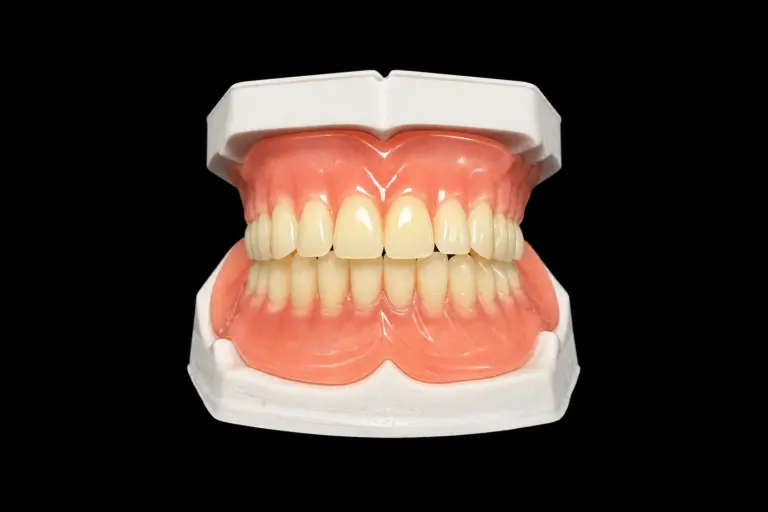
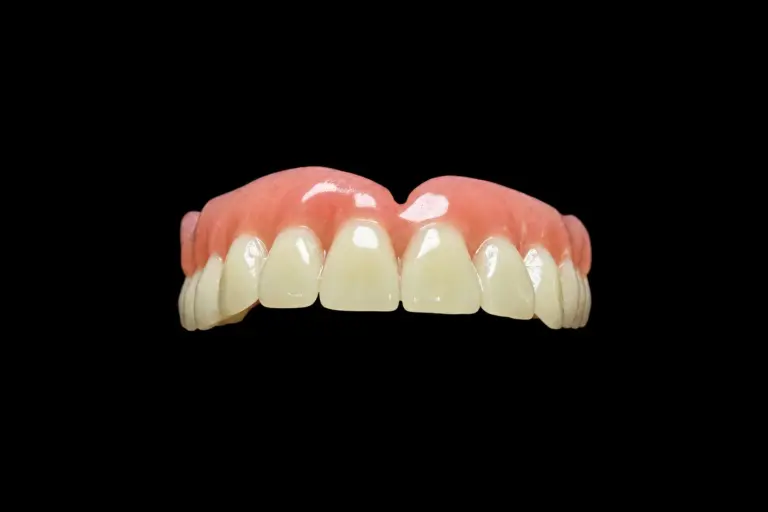
Final design · upper complete denture
Right side
Denture teeth
Midline
Fracture joined
Left side
Denture teeth
Lab-processed hard reline in the same cycle
Teeth, vertical and midline kept

Denture Repair Case at a Glance

Appliance
Upper complete denture, acrylic teeth, heat-processed PMMA base
Made by
Another lab, about 8 years ago
Damage
Clean midline fracture, two pieces, nothing missing
Opposing arch
Natural lower teeth, canine to canine plus first premolars
Records received
Both halves, closed-mouth VPS reline impression inside them, VPS bite, lower arch impression, Rx
Work done
Repair of the midline fracture and a lab-processed hard reline, in one cycle
Kept unchanged
All denture teeth, vertical dimension, midline
Turnaround
Shipped 6 working days after the case arrived

Patient Situation Before the Denture Repair

Here’s what the dentist’s notes and the records told us :

The denture was about 8 years old and had been getting looser for most of a year. The patient had started using a lot more denture adhesive to keep it in.
It broke while the patient was eating, not from a drop. The two halves came apart cleanly at the notch between the front teeth.
Nothing had been glued. The dentist asked, and the patient had brought it in as is. That matters, because glue on a fracture line takes away acrylic we'd need for the joint.
The lower arch still has natural front teeth and two premolars. No lower partial.
The patient had an older spare denture to wear while this one was away. That's the only reason sending it overseas worked for this patient.
The patient wanted to keep these teeth. They liked how they looked and were used to the bite.

What the Dentist Asked For

The Rx, condensed :

Repair the midline fracture of the upper complete denture.
Hard reline from the enclosed closed-mouth reline impression.
Keep every denture tooth where it is. Don't change the vertical dimension or the midline.
The posterior palatal seal and the borders are recorded in the impression. Keep them.
The lower front teeth are natural. Check for heavy contact up front.
Match the pink of the existing base as closely as you can.

To take the impression, the dentist fitted the halves back together, held them with sticky wax on the polished side only, and had the patient close into the VPS reline material . The tissue side and the bite came to us in one record.

The Technical Problem: Why This Denture Broke Down the Middle

A loose base flexes

An upper denture that doesn’t fit the ridge well isn’t fully supported. Every time the patient bites, the base bends a little across the palate. The midline, especially at the notch between the front teeth, takes most of that bending. Over the years, that’s where small cracks start.

Here, there was a second load on top of that. Natural lower front teeth bite harder than denture teeth. They push up on the front of the upper denture, and a loose base rocks under that push.

This isn’t unusual. In a clinical series of 150 fractured complete dentures, the midline was the most common fracture site, and poor fit and poor occlusion were among the reported causes.

Why the reline had to go with the denture repair

A denture repair joins the base. It doesn’t make the base fit the ridge again. So if we’d only joined the halves, the same flexing would start again on day one.

The dentist saw that and ordered both. Our job was to do both without the usual risks of doing them together:

The teeth can shift. Two pieces, a new tissue layer, and heat processing all give the teeth a chance to move.
The bite can open. Extra reline material on the tissue side lifts the whole denture. Lift it 1 mm and the bite is 1 mm high.
The old base can warp if it gets too hot during processing.
The joint is never as strong as the original base. In a lab study of repaired denture resin, bars repaired with heat-processed acrylic held about half the flexural strength of intact bars after thermal cycling. Heat-processed repairs did better than self-polymerizing or light-polymerized ones, but none matched intact material.

So the plan for this denture repair was all about locking the tooth position and the bite before we touched anything.

How We Met the Rx: Our Denture Repair Laboratory Workflow

1. Check-in and records

We photographed both halves as they arrived and checked them under magnification :

CheckWhat we foundWhat it meant
Do the halves fit?Yes, a tight joint along the whole lineDirect repair, no rebuild
Missing piecesNoneNo new acrylic needed except at the joint
Glue or old repair materialNoneClean acrylic on both sides of the line
Base thickness at the fractureThin over the mid-palate, measured with a caliperJoint widened enough to build back up to normal thickness
Old repair linesNoneFirst break
TeethAll present and firm, acrylic teethNo tooth replacement needed

Then we sent the photos and findings to the dentist and confirmed the denture repair plan before starting . Nothing in the Rx needed to change.

2. Model and articulator

We poured the reline impression inside the joined denture to get the master model. Then we mounted it on the articulator against the lower model, using the closed-mouth record and the VPS bite.

Before anything came apart, we recorded the incisal pin setting and made a stone index over the teeth. That index holds the exact position of every tooth, so we can check it again at the end.

3. Preparing the joint and the tissue side

Joint: we opened the fracture line slightly and roughened and cleaned both sides. That gives the new acrylic more surface to bond to than two flat faces pressed together.
Tissue side: we removed a thin layer of the old fitting surface so the reline acrylic has room and a fresh surface to bond to. The new tissue surface comes from the dentist's impression.
Borders and post dam: left as recorded in the impression, per the Rx.

4. Processing

We used heat-processed PMMA from the same resin family as the original base . Repair acrylic should match the old material, or the bond suffers.

The powder and liquid were mixed to the maker's ratio, then packed at dough stage, with the flask pressed and locked.
The flask went through a stepped, gradual water-bath cycle, not a fast boil, with the temperature kept low enough not to harm the old base.
After processing, the flask cooled slowly in the water before we opened it. Fast cooling causes bubbles, shrinkage and warping.

Once out of the flask, we tested the joint to make sure the bond was solid before the denture moved on.

5. Remount and bite

Back on the articulator, we checked three things against our records:

Vertical dimension: the incisal pin returned to the setting we recorded before processing .
Tooth position: every tooth seated back into the stone index.
Midline: unchanged.

Then we checked the bite in centric, protrusive and lateral moves. Back teeth on both sides touched evenly. Up front, the lower natural teeth hit the upper centrals hard in centric , the very thing the dentist had flagged.

We sent the dentist photos of the marked contacts and asked before adjusting . With their OK, we lightly reduced the contacts on the upper front teeth on the articulator, only enough to get them out of heavy contact, and left even contact on the back teeth.

6. Finishing without touching the fit

This is where a good reline gets ruined. A polishing wheel that catches a border, or a burr that skims the tissue side, and the fit the dentist recorded is gone.

The tissue side and borders were covered before polishing started.
Polishing tools worked on the polished surfaces only, moving away from the borders.
On the tissue side we only removed flash and sharp bits. No broad polishing.
The finished denture went back on the model to confirm it still seated with no rocking.

7. Final inspection

Thickness: checked with a caliper across the palate and at the old fracture line, with no thin spots and no sudden steps.
Bubbles and cracks: checked under magnification and with strong light through the base, with extra attention to the thick palate area and the joint.
Seat, retention and bite: checked on the model and articulator.
Final sign-off: our QC technician checked the denture against the work order and the Rx before it was packed.

Any internal bubbles at this stage mean the job gets redone, not shipped.

Finished Result of the Denture Repair

At final inspection :

Design target
At final inspection
Midline joint solid, no visible gap
Met
No bubbles or cracks at the joint or in the palate
Met
Palate thickness even, thin spot at the fracture built back up
Met
Every tooth back in the stone index
Met
Vertical dimension unchanged on the articulator
Met, pin at the recorded setting
Midline unchanged
Met
Even posterior contacts, no heavy anterior contact in centric
Met, after the approved adjustment
Borders and post dam as recorded in the impression
Met
Seats on the model with no rocking
Met
Base color matches the old pink
Close. A faint line shows on the palate side of the joint under strong light

We sent the dentist a photo of the color line before shipping, and they were fine with it . It sits on the palate, where nobody sees it when the patient talks or smiles.

At delivery, the dentist reported that the denture seated with good retention and that the patient said the bite felt the same as before . One small pressure spot on the ridge was eased chairside at the follow-up visit .

What this denture repair case doesn't show

How long the denture repair will last. A repaired base is weaker than a new one, and the patient's natural lower teeth will keep loading the front. Nobody can promise it won't break again.
Whether repair was the right call long term. That's the dentist's decision. The American College of Prosthodontists suggests evaluating dentures that have been in use for more than five years. At 8 years , the dentist and patient talked about a new denture and chose the repair and reline for now.
A case with missing pieces or glue on the fracture. Those take a different route.

Sending a Denture Repair Service Case to Istar Digital

If you have a broken denture, whoever made it, here’s how our denture repair service works:

What to send: the denture or all its pieces, an impression and a bite record. For a repair with a reline, take the reline impression inside the joined denture, like in this case. If pieces are missing, send what you have plus a full arch impression of the ridge.
Bite records: VPS, please, not wax. Wax softens and squashes in transit, and the bite arrives wrong.
Please don't glue it. If the patient already has, tell us on the Rx.
Rx: use our Rx form and write what you want kept unchanged, like teeth, vertical dimension or midline. See how to send a case.
Time without the denture: the denture has to travel to us and back. Plan for that time, and check whether the patient has a spare.
Lead time: working days at the lab, plus shipping. Rush cases are free for clients who send 10 or more cases a month. We guarantee the ship date. Customs decides the arrival date, so we can't guarantee that.
Shipping: you pay to send the case to us. We pay to ship it back.
Warranty: 1 year on acrylic denture work.
Quotes are itemized to your Rx: repair, reline, extra teeth and so on, not one bundled price.

We also make new dentures. If the dentist and patient decide a remake is the better route, see our complete dentures and partial dentures.

Istar Digital is a full-service denture repair laboratory, and every step of this case happened in our own labs: four of them in Shenzhen and Huizhou, China, with about 460 people and no outsourcing. Denture and acrylic work runs in its own department, apart from metal, milling and porcelain.

Repair and reline resins are professional-use materials covered by 21 CFR 872.3760. Istar Digital is an FDA-registered establishment, Registration Number 3039441248, which you can look up in FDA’s establishment database. The lab runs under ISO 13485.

Got a broken denture on your desk? Send it with an impression, a VPS bite and your Rx, and we’ll take it from there. Send your first case or talk to us.

FAQ

Do you take denture repair cases another lab made?

Yes. It doesn’t matter who made the denture. Tell us what you know about it, like when it was made and what it’s made of, and we’ll check the material when it arrives.

Yes. Send the denture, upper and lower models or impressions, and a bite record. We use the neighboring teeth on the impression or scan to match the new tooth’s shape, and the bite record to set its height.

Yes. Flexible partials can be repaired, relined and have teeth added. They need their own process, so please say on the Rx that it’s a flexible partial.

Send the patient name, case number, what’s wrong, and photos. If it doesn’t seat, lifts at the borders, the bite is off or the pink is clearly wrong, that’s ours to redo for free, and we’ll usually ask for the denture back and a new impression. We find the cause and agree on it with you before redoing anything.

Film the unboxing with the shipping label in view and send it to us within 24 hours, with the broken piece and the original packaging. With that evidence, we redo it free.