FDA Reg. 3039441248 · EU MDR · UK MHRA · ISO 13485
9:30–18:00 China time (UTC+8)
Case study
Implants
Provisionals

Lateral Incisor Implant Case: From Inadequate Bone to Predictable Emergence Profile

Final design · lateral implant · #7
#6
Adjacent
#7
Implant · custom abutment
#8
Adjacent
Provisional shaped the tissue for 3 months
#10 used as the template

Lateral Incisor Implant Case at a Glance

Tooth
#7, maxillary right lateral
Space
5.4 mm inter-radicular
Bone
Augmented before the implant
Provisional
3D-printed, shaped the emergence profile
Abutment
Custom-milled
Template
#10

The Problem: Narrow Space, Thin Bone, High Stakes

Sarah, a 38-year-old professional, came to her dentist with a missing maxillary right lateral incisor (#7). Twenty years earlier, the tooth had been extracted due to a failed endodontic treatment. For two decades, she’d worn a removable partial denture — functional, but not ideal for her line of work in executive consulting, where first impressions matter.

The challenge wasn’t just that the tooth was gone. The clinician’s CBCT scan revealed what we see in about 74.4% of maxillary anterior cases: insufficient buccal bone. The bone thickness at the crest measured just 0.8 mm — well below the 1.5 to 2 mm considered optimal for implant placement without additional bone augmentation.

The interarch space posed another constraint. The distance from the buccal surface of the adjacent central incisor (#8) to the would-be implant position measured 5.4 mm at the coronal level — slightly under the commonly cited guideline of 6.3 mm for a restoration that looks natural without compromising the tissue contours of the neighboring tooth. With this geometry, there was no room for error in the restorative design.

What the Dentist Required

The treating periodontist and prosthodontist submitted a treatment plan with specific clinical directives:

Bone augmentation first. The recommendation was clear: don't place an implant into insufficiently thick bone and hope for containment. Instead, perform guided bone regeneration (GBR) with socket preservation immediately following the failed root-end resection. The plan called for an allograft with a resorbable membrane to restore buccal bone thickness to at least 1.5 mm.
Precision implant positioning. Given the narrow inter-radicular space (5.4 mm), the implant couldn't be placed directly buccal. Instead, it needed to be palatal-offset — positioned closer to the palatal plate of bone, with the restoration designed to achieve proper buccal contour without depending on buccal bone that still wasn't there. This meant the prosthodontist would need to rely on the provisional crown to sculpt and maintain the soft tissue in the correct three-dimensional position.
Emergence profile management through provisional form. Once implant osseointegration was confirmed (planned for 6 months post-augmentation), the treating doctor would place a temporary abutment and need an immediate temporary crown. But this wasn't a standard immediate restoration. The prescription was specific: the temporary crown needed to establish what periodontists call the critical contour — the portion of the crown that determines the height and buccolingual position of the gingival margin. The temporary needed to be slightly over-contoured, especially in the subgingival region, so that over the following 3 to 4 months, the gingival tissues would migrate and stabilize around a carefully sculpted profile. Any under-contour at this stage would allow the gingival margin to drift coronally (apically toward the root), creating an unsightly black line at the margin.
Custom abutment to eliminate variables. The dentist requested a custom-milled abutment rather than a prefabricated stock piece. The rationale: with the implant positioned palatal-offset, a standard abutment wouldn't align the emergence profile correctly. A custom abutment could compensate for the implant's position, placing the cervical contour exactly where the provisional crown had trained the tissue to expect it.
Final restoration matching the contralateral tooth. The maxillary left lateral incisor (#10) had to be the morphologic template. The width, inclination, incisal embrasure form, and even the subtle color gradation in the incisal third would be mirrored. This meant the lab needed precise measurements and possibly a sectional shade photograph of the unrestored adjacent tooth, because any visible mismatch would be immediately obvious to a patient who looks in the mirror every day.

How We Tackled It: The Provisional Crown as a Tissue Architect

This is where the case moved from the implant surgeon’s OR and the prosthodontist’s exam chair into our lab.

Phase 1: The Diagnostic Model and Emergence Profile Analysis

When the case came to us for the provisional crown, the implant was already in place and integrated (six months post-placement). The treating prosthodontist sent:

A digital scan of the implant position (using a scan body to capture the implant platform)
A scan of the opposing and adjacent dentition
The temporary abutment (a tapered pre-fab abutment, platform 4.1 mm, height 7 mm)
A shade guide photo of tooth #10, taken in natural light with the tooth isolated

We imported these scans into our CAD software and reconstructed the three-dimensional scenario:

Implant platform location: Palatal-offset, as the dentist had planned. The platform sat roughly 1.5 mm palatal to the ideal buccolingual center line for a lateral incisor restoration in this space.
Target gingival contour: We measured the gingival zenith position on tooth #10. It was located at the mesial-distal center, and sat approximately 0.5 mm apical to the incisal edge of the tooth. For tooth #7, the target zenith for the restoration would be in an identical position — but we had to recognize that the buccal soft tissue over the implant was currently thinner and more coronal (higher) than it should be, because there was less buccal bone underneath to support it. The job of the provisional crown was to gently reposition that soft tissue apically (downward) to the correct position.
Critical contour segment: This is the 3 to 4 mm of the crown, typically in the subgingival region, that actually touches and shapes the gingiva. We designed this segment with a slight convexity (over-contour) compared to what we expected the final restoration to have. The idea: as the patient chewed and the gingiva adapted over 3 to 4 months, the tissue would conform to this intermediate contour, effectively creating a stable "landing pad" where the final crown could sit with minimal adjustment.
Occlusal and incisal characteristics: We designed the incisal third to be slightly more transparent than the final crown, because a provisional crown lives in the mouth for months and will accumulate stains. The translation table, where the crown color shifts from the lighter cervical region to the more translucent incisal, was placed slightly more palatally (further from the patient's view) on the provisional, so that if it picked up discoloration, it would be less obvious.

Phase 2: CAD Design and DLP 3D Printing

We designed the provisional crown in our CAD software with these specifications:

Material: We opted for a PMMA (polymethyl methacrylate) base, which is rigid enough to hold a shape for several months but also easy to modify and adjust in the mouth if needed
Cervical contour: Designed at the temporary abutment interface to have a slight facial-lingual bulge — about 0.4 mm additional convexity compared to a standard cervical form
Subgingival finish line: Positioned at approximately 0.5 mm subcrevicular (just below the gingival margin that the dentist anticipated once the soft tissue adapted)
Overall crown dimensions: 8.5 mm faciolingually (to replicate the width of the contralateral #10), 10 mm mesiodistally, 7 mm occlusal-cervical height
Incisal edge form: A slight double anatomical edge (a subtle ridgeline in the center, mimicking the natural tooth #10)

We 3D-printed the provisional crown using DLP (Digital Light Processing) technology, which gives us sub-0.1 mm precision in the form. This was critical because any deviation in the cervical contour would be magnified over months of gingival adaptation.

Phase 3: Adjustments for Fit and Refinement

When the provisional crown was 3D-printed, it sat on the temporary abutment with a perfect fit. However, we knew that the dentist would need to make minor adjustments in the mouth — the gingiva isn’t perfectly captured in a scan, and the exact margin position would only be finalized once the crown was in place.

We sent the crown to the dentist with the following notes:

Subgingival margin: "This crown has a 0.5 mm subcrevicular margin. Your tissue will likely migrate about 0.3 to 0.5 mm coronally over the first month as it conforms to the cervical convexity. Monitor the margin position at 1-month and 3-month recalls. Adjust with a carbide bur if needed."
Cervical contour: "The cervical form is intentionally over-contoured by 0.4 mm compared to the anticipated final crown. This is your tissue-shaping tool. As the soft tissue fills in around this contour, you're establishing the stable emergence profile."
Incisal contact: "Slight lingual contact only. This allows us to modify the incisal embrasure if gingival migration is asymmetric."

Phase 4: Managing Gingival Adaptation Over Three Months

Three months later, the dentist sent an update scan and a photograph of the provisional crown in situ. The gingival tissue had migrated apically (downward) by approximately 0.4 mm on the facial aspect — exactly as expected. The gingival margin sat now where we’d anticipated, at the correct zenith position relative to tooth #10.

Importantly, the soft tissue thickness at the facial aspect had increased. This wasn’t new bone — that would take more than three months. Rather, it was a combination of remodeling and the maturation of the mucoperiosteal tissues around the implant abutment.

The dentist then sent us the final specifications for the definitive crown:

Gingival margin position: Confirmed at the location where the provisional had trained it to sit
Cervical contour: Now we could design this to be less convex — the tissue no longer needed sculpting, it was stable
Abutment type: Custom zirconia abutment (to eliminate titanium showing through the thin buccal tissue)
Crown: Lithium disilicate, monolithic
Shade and contour: Matching tooth #10, with the tooth dimension measured at 6.8 mm buccolingually

The Final Restoration: What We Delivered

The custom zirconia abutment was milled with these characteristics:

Implant platform: 4.1 mm
Abutment diameter at the cervical third: 5.8 mm (designed to fit under the newly stable gingival contour without impingement)
Cervical angulation: 6 degrees of divergence from the implant axis, compensating for the palatal-offset implant position so that the restoration would emerge facially at the correct angle
Finish line: A chamfer finish line, positioned at the predetermined gingival margin location

The final crown was designed as a monolithic lithium disilicate restoration. No layering, no exposed metal. The reasons:

Monolithic strength: With a custom zirconia abutment providing the support, we didn't need the additional bulk of a zirconia core. Lithium disilicate alone is strong enough for an anterior single tooth.
Emergence profile precision: Monolithic means the entire cervical form is one material — zirconia would have a different optical property than a layered porcelain at the cervical, and with the thin tissue in this case, any mismatch would be visible.
Shade matching: We used a medium A2 lithium disilicate block, then selectively stained the incisal third with enamel stains to replicate the color gradient of tooth #10. The cervical third was glazed to achieve the slight matte finish of natural gingival-third enamel.
Dimensions: Final crown measured 6.8 mm buccolingually, 8 mm mesiodistally, 9.5 mm occlusogingivally. The incisal edge sat 0.2 mm palatal to the incisal edge of tooth #10, so that even if there was any future gingival recession on #10, the implant crown wouldn't appear longer.

The result: When the crown was delivered and cemented, the gingival margin perfectly matched the zenith position of the contralateral tooth. The transition from the crown to the gingival tissue was seamless. No dark line at the margin. No over-contour causing food trap. The patient looked in the mirror and couldn’t distinguish it from her natural tooth.

Key Takeaways for Your Case

If your patient has a similar scenario — narrow space, insufficient bone, high esthetic demands — here’s what we’ve learned:
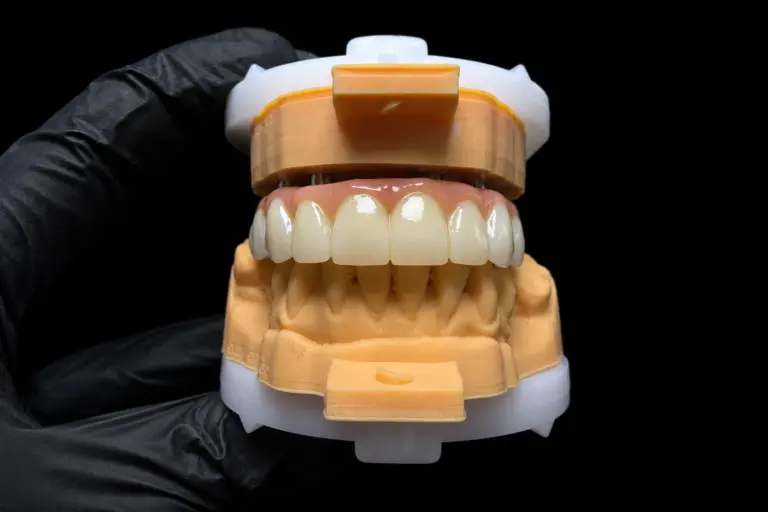
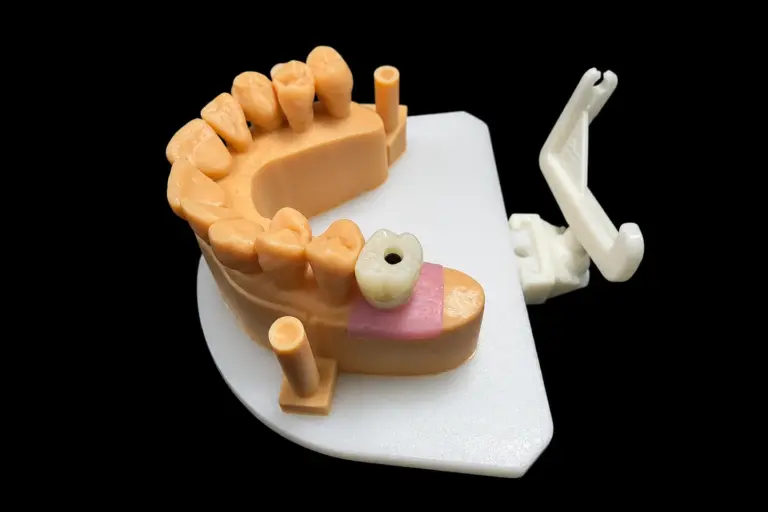
The provisional crown is a precision instrument. It's not just a placeholder. Designed correctly, it shapes the soft tissue toward the optimal emergence profile.
Custom abutments are worth it in tight spaces. Stock abutments force compromises in emergence angle. A custom abutment designed to match the implant's actual position allows the crown to emerge at the correct buccolingual angle every time.
Monolithic materials work well here. No color mismatch at the cervical, no risk of veneer fracture if the margin sits exactly at the tissue line.
Shade matching the contralateral tooth is non-negotiable. This is where most failures get attributed to the implant when they're really about the crown. Take the time to get the color right.
Gingival adaptation takes time. Plan for a minimum of 3 months in provisional form if soft tissue remodeling is a goal. Rushing to the final restoration before the tissue has stabilized often results in a compromise on the final margin position.